Even before your camera, the computer monitor is the tool that the photographer uses most often. With the advent of digital techniques in photography, we spend more and ore time in front of this large screen where we select the best shots, we correct minor errors, improve the overall appearance of our best photos (and browse too many web site or play too many silly games). However, most photographers relegate the purchasing decision for the computer monitor to very approximate analysis (looking at a shop display shelf) or quick browsing into technical specifications.
But it does not have to be like that. There are a few important things to check and several key aspects to check during this important process. Buying a monitor is not simple, but it does not have to be a very complex protracted decision. Most of the critical factors are readily available (and often overlooked).
Screen size
The very first factor is the screen size. Choice is large from all manufacturers, but you must start by defining what is the optimal size you intend to buy. It comes from the size of your desk and the kind of confort you want to have (too large a screen means you have to be much farther from its front face).
Usually, you would not look at a size smaller that 23″ because most of the applications we use are crouding our screen surface with sub-windows, tool bars, multiple menus, etc. Those are all very useful but they eat up a lot of screen size. 23″ or 24″ screen sizes more and more appear as the minimum for confort.
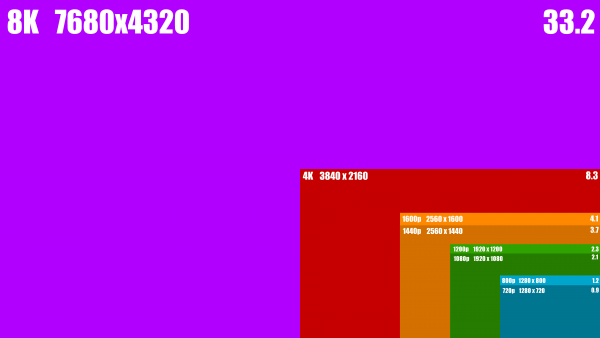
But even more importantly, you should think about the resolution of your display. A large screen with too few pixels may not be worth it. So, check the maximum resolution accepted by your computer and see what maximum resolution the monitor candidates can accomodate. Today, it is fairly easy to get a 1080p/1080i monitor (displaying most commonly 1920×1080 or 1920×1200 pixels) or one of the higher resolutions like:
- 2560×1440 pixels
- 3840×2160 pixels, also know as 4k
(These figures may vary slightly with the exact size of the panel, but they are industry standards you will find easily on the market).
I would recommend that you start at 1920×1080 pixels, but also look at the higher end options too, since they bring a lot more confort (if you have enough desk space to accomodate them). 2560×1440 pixels with a 25″ to 27″ panel size is usually a very good size for our photographer’s needs. Going further would probably push you into a larger monitor. (30 inches mean a much bigger display on your desk and probably the need to watch it from a longer distance!)
Monitor technology
You will find all kinds of available technologies, with incomprehensible abbreviated names. But a few ones are important recognizing.
TN screens
Those are usually cheap… and look cheap too. Specially for us photographers. For one reason: This TN (Twisted Nematics) technology is very sensitive to the viewing angle. If you are exactly in front of the display, everything looks fine. But the more you move out of the exact axis, the more contrast drops and the more colors shift (mostly unpredictably). Things become quickly so unreliable that you should avoid them.
VA, AVA and MVA screens
Those have very good viewing angles and high contrast. But unfortunately, they are intrinsically less able to reproduce colors correctly.
IPS screens
Those are more expensive, but they have excellent contrast and are very good at displaying precise colors. Some of them are factory-calibrated to be sure that you get the maximum result and this makes quite a difference when you look at a photo.
Some technologies you should not care about
Some fine technological feats are of no use for the photographer (they are intended for other categories of monitor buyers):
- G-sync or FreeSync are strictly for video game fans
- Response times have nearly no influence on mostly static images we use
- Refresh rates should be at least 60 Hz, but which monitor is not? Higher frequencies will reduce eye strain but only marginally.
Some technologies you may want
Check for the presence of a USB hub or multiple video inputs to connect to your computer (VGA may be present but it provides a relatively limited analog input that is not up to the task of excellent colors rendering). You may appreciate the presence of loudspeakers, but this would have nothing to do with your photographer’s activity, I guess.
Color depth
The final critical feature is the size of the color space that the screen can display. SRGB has been known for years as able to produce adequate colors for a computer display. But it is also clear that if you have pictures in AdobeRGB, the color gamut (the extension of colors that are included is larger: You get deeper reds or deeper blues). Most monitors will now display 99% of sRGB.
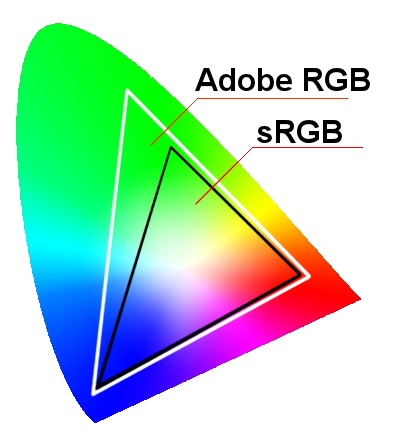
I don’t like very much the usual graphic to display this, but the picture shown here on the right gives you a rough idea of what can or cannot be displayed.
Don’t compromise and never accept less than 100% sRGB. But pushing for near full AdobeRGB has a huge impact on cost. So, if you decide to go that way, be sure -at least- that you will have a stable light in your room (forget about a nice large window opening on the outside, lighting your desk and monitor), and that you will regularly calibrate your monitor for color stability.
Personally, I still consider that the cost of full AdobeRGB is still a bit too high (and it may stay that way for quite some years because of the inherent physical limitations of technologies currently used). But it’s really an open question if you live from your photograhic work…
After you buy
When your computer monitor arrives, the first and most important thing to do is to calibrate it. Either buy or rent a calibration sensor and you will be able to obtain the most out of your expensive purchase. Many people propose software (even free software) to do some kind of calibration. This is insufficient and very difficult to use if you are not trained for that softare.
I would consider renting a calibration sensor, contacting friends to buy one for several photographers, borrowing one from somebody else (even getting somebody to make you a gift). But do calibrate your monitor!
Until you do this calibration, you will not get the best your monitor can offer. And you will be surprised by the impact this has: It is immediately visible on nearly all the monitors (even on some of those professional monitors which come factory-calibrated).
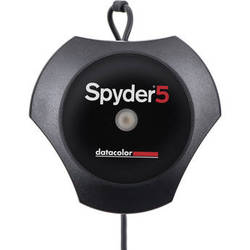
Personally, I use a Datacolor Spyder5. Good software (easy to use), relatively fast and reliable.