
Problem statement
Sometimes, I am somewhat dissatisfied with the size of my digital photographs. The simplest way to improve (after the fact) is to run any Photoshop-like program, and apply a resampling (resize) preferably with the Lanczos method, in order to get 2x or 3x or 4x more pixels. It is fast and efficient, but it usually generates a slightly blurry but bigger picture. If the target is a large format print that could be watched from a short distance, or for something like printing on a very large canvas, I should have more details in the picture (more than what was initially collected by the camera). The image is still too small.
The other approach would be to use a software tool like Topaz Photo AI or the all-new Adobe Photoshop “Image Enhancer AI”. Those are Pro tools (“Pro” means “expensive”): Topaz costs 199$, its competition often relies on monthly subscriptions. For a normal guy (who only needs it a few times per year, at most), this is not applicable.
Why not look toward (free) Open Source tools? Fortunately, some are existing.
And I added another constraint: I want it to run on my own PC (no cloud resources and/or cloud subscription like what StableDiffusion requires).
The general idea
For a few months, I have been impressed by the multitude of Artificial Intelligence solutions (Didn’t you hear about something named ChatGPT?) and not only to generate human-readable text. Tools like StableDiffusion, Dall-E, or Midjourney generate spectacular pictures from a textual description (a prompt). But they often include a mechanism to extend their text-to-image activity to a much larger scale (usually they produce small pictures to sparingly use computer resources).
My solution – in details
I won’t detail the steps taken to reach that solution. But here it is.
One strong PC, with two options/directions that could be imagined.
- A powerful graphic/video card (not always, but often based on nVidia GPU).
- A super-powerful PC with (most critical) a lot of memory.
In my own case, I chose:
- i9-13900K (with a good AiO liquid cooler, because this beast can heat up quite quickly when running 100%),
- 64 gigabytes of DDR4-DRAM memory (you will hear that this is the limiting factor for the image size).
But, you could work with a smaller CPU (with a lot of patience), or a Mac computer.
Nobody would claim this is a cheap PC, but it definitely works reasonably well.
EasyDiffusion installation steps
EasyDiffusion is a free version of a tool very similar to StableDiffusion. You may install it on your PC, and it will run either on the CPU or on the video card.
- Download the installation program from the EasyDiffusion home page (according to your needs, you’ll choose the binary for Windows, Linux, or Mac).
- Follow the installation steps from the page, don’t worry about changing any option right now. You will need some patience (it goes and download additional models and other packages, it will build some of the files during the installation).
- Run the program from the Windows “Start” menu. This will open a Command window to run a few background things (no need to even look at this), then a browser window giving access to the EasyDiffusion user interface.
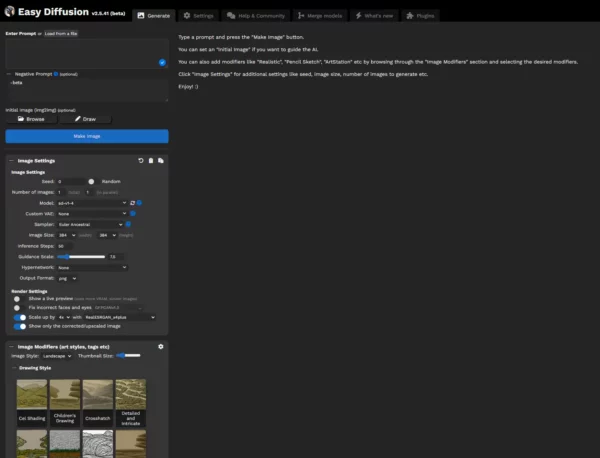
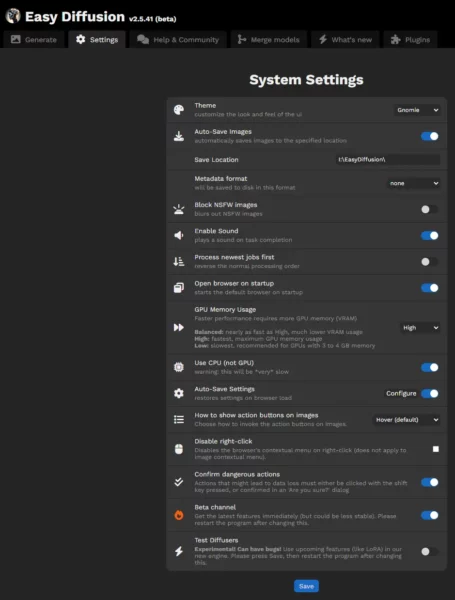
- For the first configuration, I would recommend clicking at the top of the page on “Settings” and selecting the following program settings:
- Auto-save Images: YES
- Save Location: select the appropriate directory to save your creations.
- Open browser on startup: YES
- GPU memory usage: High (with 64 GB of DRAM, you want to use it all or as much as possible).
- Use CPU (not GPU): YES
- Beta channel: NO.
Create a text file whose name should be YR_MoreResolutions.plugin.js with the following text contents:
// ==UserScript==
// @name         Ski-SDUI-MoreResolutions
// @version      0.1-YR
// @description  More Resolution Options
// @author       Super.Skirv, JeLuF, YR
// ==/UserScript==

(function() {

	options="";
	for(i=6; i<=32; i++) {
		options += '<option value="' + (64*i) + '">' + (64*i) + '</option>';
	}
    options += '<option value="' + 3072 + '">' + 3072 + '</option>';
    options += '<option value="' + 4096 + '">' + 4096 + '</option>';
    options += '<option value="' + 4640 + '">' + 4640 + '</option>';
    options += '<option value="' + 6960 + '">' + 6960 + '</option>';
    options += '<option value="' + 8192 + '">' + 8192 + '</option>';
    document.getElementById('width').innerHTML = options;
    document.getElementById('height').innerHTML = options;

})();
- Install the plugin, by copying the YR_MoreResolutions.plugin.js file in the C:\EasyDiffusion\plugins\ui directory.
Operation and typical use
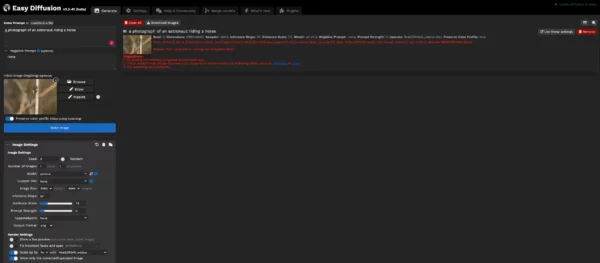
When arriving at the EasyDiffusion page in your browser, you will need to feed it with a source picture to enlarge and the right upscaling options:

- Choose the source image with the “Browse” button.
- Custom VAE: None
- Image size: 3072 (width) by 2048 (height) – for 64 gigabytes of DRAM.
- This parameter is dictated by:
- The need to work on an image as large as possible
- The memory size limitation. If you have only 16 gigabytes of DRAM memory, you will need to reduce these parameters each in a ratio of 2: 1536 by 1024. But you can explore the optimum for your configuration.
- Swap the parameters if the image is in portrait (vertical) orientation.
- This parameter is dictated by:
- Inference steps: 50 (this has practically no influence, you can leave the default value)
- Prompt strength: 0 (This is the critical value: It will ensure that EasyDiffusion AI never tries generating a new artificial image from the prompt text, but concentrates on the upscaling job).
- Output format: choose the right file format for you.
- Show a live preview: NO
- Scale up by 4x with RealESRGAN_x4plus (Avoid RealESRGAN_4xplus_anime_6B which is totally not for photography)
- The prompt (at the top of the page), and the Seed value (in “image settings”) are not used, except when naming the output file.
If you don’t have enough memory, you can always reduce the “Image size” or you get a message like the following:
The message tells you what memory size it tried to allocate/reserve. This will guide you when reducing the “Image size”.
If you are correctly configured, after a few minutes, you will see the result like in:
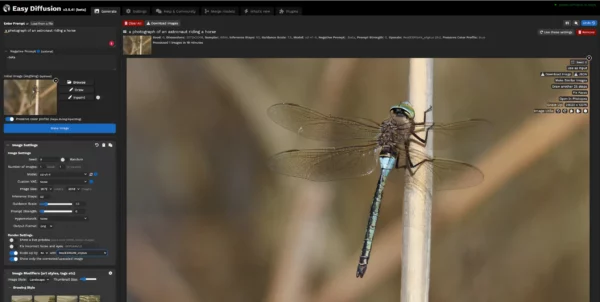
Notice: the new resolution is now 12288 x 8192 pixels (we left from 6960 x 4640 pixels, to reach no less than 100 mega-pixels). But, above all, the Artificial Intelligence (of the ESRGAN network) determined new pixels not only interpolated but imagined as complementary to the existing ones and totally credible.
In the picture used for this example, don’t spend time checking the blurred background. But take a look at the fine details in the structure of the dragonfly wings. It may not be perfect (from the professional entomologist’s point of view, there are anatomy errors), but the ribs/veins and the light reflections are very natural-looking, even in areas where they are only half-drawn or half-blurred. The same remark applied to the eyes and antennas of the dragonfly.
On the opposite, don’t even believe the proposal from the software: It’s no use clicking the button to upscale again to 20032 x 13376; You already reached the maximum size allowed by the available memory. You can’t go further with only 64 GB.
If you want to check the results, I made the files available: