Digital photography changed a lot of things but there is an invariant left: It has to catch light on a sensitive surface. So, for a long time, the photographers learned to play with light to draw the maximum from it. And during years, we saw pros lugging around their load of equipment they were the only ones to even understand. Among the most bizarre objects were the optical filters. And they are the subject of many a myth.
For a long time, we saw round and square filters, filter holders, gelatin or gel filters in colors or in grey hues, progressive graduated neutral density filters, stacks of filters, surprising little colored objects which were used to reinforce the sky, the clouds, the grass, the trees, the mountain glaciers, the lakes reflections, and which were used to smooth the sky, the clouds, the grass, the trees, the mountain glaciers, the lakes reflections. In short, apart from a few specialists as admired and as venerated as Mayans High Priests (apparently, without the need to practice human sacrifice to support their credibility, though), nobody really knew what all this was about. OK! I may be slightly off the board here (though I am sure I never heard of a photographer sacrificing live animals before shooting a landscape picture). Some people had learned a few tricks and recipes, but it was most incomprehensible to the masses like you and me.
With the advent of digital photography, everything changed: Photoshop or The Gimp or any other photographic software was able to replace all colored filters and the photographer could drop his collection of gelatins into the junk bin before going to simpler (or more complex) issues. We ran for the software manuals
But this was an error! If it stays true that the immense majority of filters are already in the first Photoshop-like software package, this is not a general rule. Colored filters are trivial to apply in Photoshop. Graduated filters are so easy that kids can use them. Color correction, exposure correction are but a click away in Photoshop and easier than a bunch of fragile gel filters attached to a complex holder. And if you do it wrong, just Undo it and try again.
But there are two optical filters that are still totally unavoidable even with the best software (and I am not speaking about the useless UV filter whose main application is protection against frontal shocks):
- Polarizing filter
- High-density neutral grey filter
Polarizing
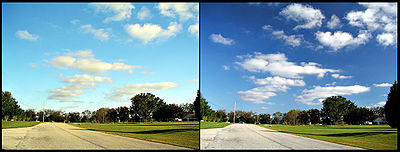
A polarizing glass selectively filters light detecting its polarisation (a physical property quite difficult to perceive in most conditions but easily measurable on reflected light). The filter will reduce brightness of reflections without impact on the rest of the picture, an aspect that is inaccessible to Photoshop. It also plays a great role on slecting the desnity of the blue sky which varies in function of the sun light angle.
 |
| The effects of a polarizing filter on the sky in a photograph. The picture on the right uses the filter. |
If you keep only one filter, this will be a polarizing filter.
Only one remark: If you find an old pola-filter from silver-analog-film times, check first if it is a linear pola. Films were not very regarding, but digital sensors can only react to circular pola filters. Note that this remark becomes less and less important since all current filters are actually circular polarizing filters.
High-density neutral grey
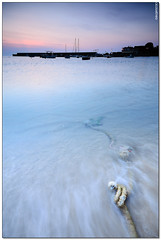
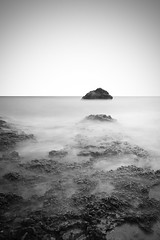
The other useful filter is a high-density neutral grey one. You can easily see through a low-density (pale) neutral grey filter but it is not very useful with the extreme range of sensitivity that our photo cameras exhibit today: Just rotate the sensitivity wheel a little or drop back to Photoshop. But, if you take a ND400, you’ll immediately notice that even if you can still see something through it, it nearly black now. The filter is so dense that it has the same effect as dropping the sensitivity though the floor a lot below the usual minimum of ISO 100. Consequence: Long exposures even at mid-day: Instead of 1/200s, you’ll need 5s exposures (1000 times more). Welcome to motion blur even on slow objects and under the mid-day sun.
The most common application (or the most commonly used) is landscape photography incorporating motion blur of sea water or white water river, as in the examples below.
 |
 |
 |
Beware!
To answer a question from Sébastien, I will also remind you of some elementary precautions to apply when using a filter (any filter).
- Always buy a high-quality filter: You use a luxury pro lens with fluorite or ED glass optical elements; Don’t drop any plastic sheet in front of it if you want to avoid re-introducing ugly additional effects (like optical distortion and chromatic aberration). Unfortunately, the prices goes with this requirement.
- If you use a wide-angle lens (this is often the case for landscape photography, isn’t it?), select a low rim filter to avoid seeing it obstructing slightly the field of view (generating a small vignetting effect). Here, again, it comes with a price (all the more for the polarizing filters which are mechanically more complex).
- For neutral grey filters, beware of the chromatic shift introduced by the denser and cheaper filters. It is often easy to compensate in a software suite, but the filter may easily be slightly blue or orange (depending on brands).
So, what? Two filters in the bag, this is no problem.
Of course, with five lenses, you may have five different screwing diameters. But this is still much better than the whole collection of the past.
Comments
3 responses to “You only need two filters”
This is unsurprisingly an interesting post. The title raises a question: how can I tell an high-quality filter from a bad one ? The price could be an indication to eliminate obviously bad/cheap candidates, but that’s definitely not enough. Any advice ?
Within a brand, the cheapest is low quality and the most expensive is the high-quality. Unfortunately, this does not really make a good comparison from brand to brand.
Clearly, the best filters are done by reputable companies (There is a lot of research and development involved within the seemingly simple filters; Small companies or companies specializing in “me-too” products usually do not have the R&D power to create a high-quality product). For example, Sunpak, Jessops or Hama are more distributors than designers. Hoya, B&W build some incredibly good filters (and a few cheap ones too).
Thank you for coming back with specific brand names.
I have inadvertantly checked the problems with an older linear polarizer on a digital camera. The auto-focus goes mad, presumably because the auto-focus light path goes through its own linear polarizers. Switching to manual focus works fine.